
Getting started with Angular
What is Angular?
In my opinion, Angular is the platform and framework for building your own customized html tags. While html has a fixed set of tags (e.g. <h1>, <a>, <form>, <input>, etc) you can use to build your website, Angular lets you create your customized tags (e.g. <temperature-converter>, <my-login-form>, etc) with the existing html tags, determine how they should look like and behave.
But these tags built in Angular are contained within the Angular ecosystem, such that you cannot simply reuse these tags in your normal html pages, but your whole website is made up from all these customized tags you create. There will be a main tag (e.g. <app-root>) in a single html page provided with the Angular framework, and the app-root can contain and link to other customized tags you create, but everything is contained within the <app-root>. And of course, because your browser only recognize html tags, all the customized tags you created will be compiled into normal html.
**
Sometimes, you can think of it as creating a website with extra steps. But the benefit of creating the customized tags is so that you can reuse it, instead of creating the html all over again. These “customized tags” are known as Components in Angular. Components not just allow you to reuse the appearance, but also the behavior of the tags. Like what should happen when you click this button, or type in the textbox. And with proper knowledge and implementation of the framework, it also makes the code much easier to understand and maintain. However, I would like to stress on the “proper knowledge and implementation”, as I have seen many cases of misuse, such that sometimes it might be easier to create normal html.
Getting Started
As a platform, Angular automates quite a number of steps for users to make the code clean and easy to understand. For example, for each component you create, Angular separates it into 3 files - behaviour (typescript), appearance (html), and formatting (css). And these 3 files need to be in 1 folder, having the same names, but different extensions. It can be rather troublesome to do that manually. So Angular comes with a Command-Line Interface (CLI), so that these manual tasks can be automated.
To start developing with Angular, you’ll need NodeJS and NPM installed. Then you install the Angular CLI with the following command.
npm install -g @angular/cli
With that, now you can create your applications.
Example
In this article, I will demonstrate how to create a simple temperature converter (C to F / F to C). Start by asking Angular to generate the barebones with the following command and just choose the default options.
ng new temperature-converter
That’s it! A whole structure of folders is created for you and it is a running application by itself.
You can run it to see how it looks like by running ng serve, and you will be prompted to view the application by going to http://localhost:4200 in your browser.

As you can see, ng is the angular command and you have various options to do various things. For a whole list and more information, run ng help.
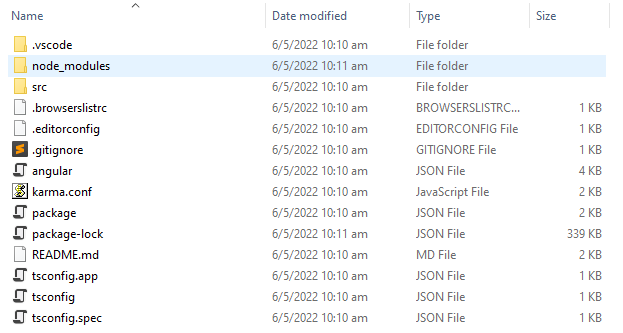
You can see the index.html in the src folder, and an unfamiliar <app-root> html tag in it. The <app-root> is created by default for you, and the code for it can be found in the src/app folder.
In fact, you probably only need to be concern about the src/app folder, the rest are usually not of a main concern in the development process.
Description of Files
These are the files you’ll see in the src/app folder:
- app.component.css
- app.component.html
- app.component.spec.ts
- app.component.ts
- app.module.ts
The files prefixed with app.component are all for the <app-root> component created by default. The app.component.spec.ts is the unit test. The app.module.ts is the module file for importing all the other modules, and declaring what is exported from your application. So the module is at the top of the hierarchy and all other components, services are under it.
Service
As of the MVC pattern, it is a good practise to isolate the business logic so that it can be imported and reused when needed. Angular thinks so too, so there is command to generate the service file. For the purpose of our application, we will create a temperature-converter service to convert celsius to fahrenheit, and vice versa.
ng generate service temperature-converter
This will create 2 files - temperature-converter.service.ts and temperature-converter.service.spec.ts. The file with the extension spec.ts is the unit test. Let’s focus on the main service file for now - temperature-converter.service.ts. Notice that Angular automatically added the service to your extension so that it is prominent that the file is a service. The generated code will be as such:
import { Injectable } from '@angular/core';

@Injectable({
  providedIn: 'root'
})
export class TemperatureConverterService {

  constructor() { }
}
Note: The
@Injectableis a decorator for the class, so that it can be injected into other classes by dependency injection.
And we will just add 2 functions to convert celsius to fahrenheit, and vice versa, into this file.
import { Injectable } from '@angular/core';

@Injectable({
  providedIn: 'root'
})
export class TemperatureConverterService {

  constructor() { }

  convertCtoF(c: number): number {
    return parseFloat(((c * 9 / 5) + 32).toFixed(1));
  }

  convertFtoC(f: number): number {
    return parseFloat(((f - 32) * 5  / 9).toFixed(1));
  }
}
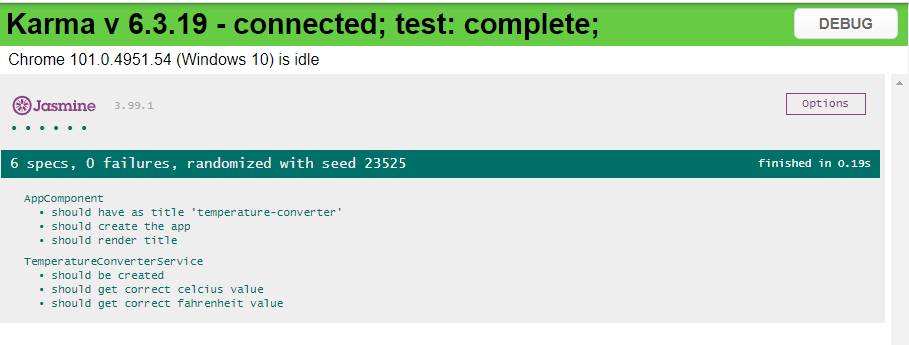
Testing
As a good practise, we should write some unit tests to confirm that the functions will give the correct results. So, updated the temperature-converter.service.spec.ts to be as such.
import { TestBed } from '@angular/core/testing';

import { TemperatureConverterService } from './temperature-converter.service';

describe('TemperatureConverterService', () => {
  let service: TemperatureConverterService;

  beforeEach(() => {
    TestBed.configureTestingModule({});
    service = TestBed.inject(TemperatureConverterService);
  });

  it('should be created', () => {
    expect(service).toBeTruthy();
  });

  it('should get correct fahrenheit value', () => {
    expect(service.convertCtoF(0)).toEqual(32);
    expect(service.convertCtoF(100)).toEqual(212);
    expect(service.convertCtoF(37.9)).toEqual(100.2);
    expect(service.convertCtoF(50.1)).toEqual(122.2);
  });

  it('should get correct celcius value', () => {
    expect(service.convertFtoC(0)).toEqual(-17.8);
    expect(service.convertFtoC(100)).toEqual(37.8);
    expect(service.convertFtoC(212)).toEqual(100);
    expect(service.convertFtoC(32)).toEqual(0);
  });
});
You can run the unit test with ng test.
Component
Now, let’s focus on our main component <app-root>. There are 4 files created to serve this component:
- app.component.css
- app.component.html
- app.component.spec.ts
- app.component.ts
The app.component.ts is where all your variable declaration and functions should reside, the app.component.html is the template where you write the html to determine how the component should look like, and the app.component.css is the stylesheet for your component. The default app.component.ts generated is as such:
import { Component } from '@angular/core';

@Component({
  selector: 'app-root',
  templateUrl: './app.component.html',
  styleUrls: ['./app.component.css']
})
export class AppComponent {
  title = 'temperature-converter';
}
The @Component is a decorator to group the files together. The selector indicates what should be the html tag, which in this case, it’s <app-root>. The templateUrl indicates the html file for this component, and the styleUrls indicates the stylesheets. Our class is named AppComponent. The title is just a property generated by default, and we don’t need that, so it can be safely deleted.
We will convert the code to be as such:
import {Component, Input} from '@angular/core';
import {TemperatureConverterService} from "./temperature-converter.service";

@Component({
  selector: 'app-root',
  templateUrl: './app.component.html',
  styleUrls: ['./app.component.css']
})
export class AppComponent {
  fahrenheit?: number;
  celsius?: number;

  constructor(
    private temperatureConverter: TemperatureConverterService
  ) {
  }

  updateFahrenheit(){
    if(this.celsius == null) this.celsius = 0;
    this.fahrenheit = this.temperatureConverter.convertCtoF(this.celsius!);
  }

  updateCelsius(){
    if(this.fahrenheit == null) this.fahrenheit = 0;
    this.celsius = this.temperatureConverter.convertFtoC(this.fahrenheit!);
  }
}
Firstly, we declare the fahrenheit and celsius properties to bind the content to be entered and displayed in the input boxes, so that these 2 variables will automatically contain what is entered or shown in the respective input boxes.
Next, we inject the TemperatureConverterService we created earlier into our constructor, so that we can use the functions. Notice the import statement - import {TemperatureConverterService} from "./temperature-converter.service"; at the top. Then the private temperatureConverter: TemperatureConverterService is added in the parameter of the constructor.
Last but not least, we add the 2 functions - updateFahrenheit() and updatedCelsius() to be called whenever the value in the input box changes.
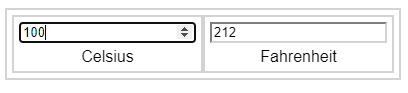
We also have to change the app.component.html, so that it will look like we want it to look like. Firstly, delete all the content in the file and replace it as such:
<div class="box">
  <div class="box">
    <input type="number" data-test-id="celsius-input" [(ngModel)]="celsius" class="border" (ngModelChange)="updateFahrenheit()" />
    <div class="box-text">Celsius</div>
  </div>
  <div class="box">
    <input type="number" data-test-id="fahrenheit-input" [(ngModel)]="fahrenheit" class="border" (ngModelChange)="updateCelsius()" />
    <div class="box-text">Fahrenheit</div>
  </div>
</div>
The [(ngModel)] indicates a two-way bind between the html tag and the variable it is assigned to. In the case of [(ngModel)]="celsius, any change to value the value in the input box, will change the value assigned to the celcius property in the class, and any change of value to the celsius property in the class app.component.ts will be reflected in the value of the input box. The (ngModelChange) will call the function whenever there is any change to the value specified in the ngModel. So, whenever someone types in the celsius input box, the updateFahrenheit() function will be called.
The data-test-id is just a data attribute for us to identify the html tag for testing in our unit test.
To style the component, update the app.component.css to be as such.
.box {
  padding: 5px;
  border-width: 2px;
  border-color: lightgrey;
  border-style: solid;
  display: inline-block;
}

.box input {
  border-color: lightgrey;
}

.box-text {
  text-align: center;
  font-family: sans-serif;
  margin-top: 5px;
}
Finally, as always a good practise to have test cases to check your code is working correctly, update the app.component.spec.ts to be as such.
import {ComponentFixture, TestBed} from '@angular/core/testing';
import { RouterTestingModule } from '@angular/router/testing';
import { AppComponent } from './app.component';
import {FormsModule} from "@angular/forms";

describe('AppComponent', () => {

  let fixture: ComponentFixture<AppComponent>;
  let component: AppComponent;
  let compiled: any;
  let celsiusInput: any;
  let fahrenheitInput: any;

  beforeEach(async () => {
    await TestBed.configureTestingModule({
      imports: [
        RouterTestingModule,
        FormsModule
      ],
      declarations: [
        AppComponent
      ],
    }).compileComponents();
  });

  beforeEach(() => {
    fixture = TestBed.createComponent(AppComponent);
    fixture.autoDetectChanges(true);
    component = fixture.componentInstance;
    compiled = fixture.debugElement.nativeElement;
    celsiusInput = getByTestId("celsius-input");
    fahrenheitInput = getByTestId("fahrenheit-input");
    fixture.detectChanges();
  });

  const getByTestId = (testId: string) => {
    return compiled.querySelector(`[data-test-id="${testId}"]`);
  };

  const pushCelsiusValue = async (value: number) => {
    celsiusInput.value = value;
    celsiusInput.dispatchEvent(new Event('change'));
    celsiusInput.dispatchEvent(new Event('input'));
    await fixture.whenStable();
    await fixture.detectChanges();
  };

  const pushFahrenheitValue = async (value: number) => {
    fahrenheitInput.value = value;
    fahrenheitInput.dispatchEvent(new Event('change'));
    fahrenheitInput.dispatchEvent(new Event('input'));
    await fixture.whenStable();
    await fixture.detectChanges();
  }

  it('should create the app', () => {
    expect(component).toBeTruthy();
  });

  it('Typing value in Celsius field gets correct Fahrenheit value', async() => {
    await pushCelsiusValue(500);
    fahrenheitInput = getByTestId('fahrenheit-input');
    expect(Number(fahrenheitInput.value)).toEqual(932);
  });

  it('Typing value in Celsius field gets correct Fahrenheit value upto 1 decimal values', async() => {
    await pushCelsiusValue(32);
    fahrenheitInput = getByTestId('fahrenheit-input');
    expect(Number(fahrenheitInput.value)).toEqual(89.6);
  });

  it('Typing value in Fahrenheit field gets correct Celsius value', async() => {
    await pushFahrenheitValue(932);
    celsiusInput = getByTestId('celsius-input');
    expect(Number(celsiusInput.value)).toEqual(500);
  });

  it('Typing value in Fahrenheit field gets correct Celsius value upto 1 decimal values', async() => {
    await pushFahrenheitValue(100);
    celsiusInput = getByTestId('celsius-input');
    expect(Number(celsiusInput.value)).toEqual(37.8);
  });

  it('Perform series of actions', async() => {
    await pushFahrenheitValue(10);
    celsiusInput = getByTestId('celsius-input');
    expect(Number(celsiusInput.value)).toEqual(-12.2);

    await pushCelsiusValue(10);
    fahrenheitInput = getByTestId('fahrenheit-input');
    expect(Number(fahrenheitInput.value)).toEqual(50);

    await pushFahrenheitValue(200);
    celsiusInput = getByTestId('celsius-input');
    expect(Number(celsiusInput.value)).toEqual(93.3);

    await pushCelsiusValue(248);
    fahrenheitInput = getByTestId('fahrenheit-input');
    expect(Number(fahrenheitInput.value)).toEqual(478.4);
  });
});
I will not be covering how to write test cases for Angular now, as it will be too lengthy, and leave it for future posts.
Run ng serve and open your browser to localhost:4200 again. Tada! Try to enter something in either of the celsius and fahrenheit input boxes.
The full code is available on https://github.com/thecodinganalyst/temperature-converter.