
Getting started with NestJS
NestJS is a nodejs framework for building backend applications, that is secure and scaleable. Following the SOLID principle, and having a modular architecture and built-in dependency injection system, it allows developers to create reliable and efficient backend systems without much effort.
To get started, we install the nestjs cli with npm install -g @nest/cli, then create a new project with nest new <project-name>. It then pretty much setup everything for us.

First, let’s look at the main.ts, which is the file that really bootstraps our application, and you can see from the code that it listens to port 3000.
import { NestFactory } from '@nestjs/core';
import { AppModule } from './app.module';

async function bootstrap() {
  const app = await NestFactory.create(AppModule);
  await app.listen(3000);
}
bootstrap();
So we navigate to localhost:3000 on our browser, and it just shows the Hello World!.
The nestjs structure is very similar to Angular, as in it is grouped into modules, and it uses the @ decorator with the imports, exports, providers etc to classify what are imported and exported to/from the module, which services it provides.
@Module({
  imports: [],
  controllers: [AppController],
  providers: [AppService],
})
export class AppModule {}
With the initial setup, nestjs creates an AppModule in the file named app.module.ts. Since nestjs is framework for building web backend applications, it has a controllers array variable to list the files which exposes the apis from this module. The AppController is the name of the class in app.controller.ts.
It also has a provider array variable with AppService in the list. Having the AppService in the providers variable means that AppService is available for dependency injection.
Let’s first look at the AppService in the app.service.ts. The @Injectable() decorator marks the class as a provider, and it just has a single function called getHello().
@Injectable()
export class AppService {
  getHello(): string {
    return 'Hello World!';
  }
}
The AppController class in the app.controller.ts is decorated with the @Controller() to indicate that it is a controller and it can receive inbound requests and produce responses.
@Controller()
export class AppController {
  constructor(private readonly appService: AppService) {}

  @Get()
  getHello(): string {
    return this.appService.getHello();
  }
}
First, in the constructor, we inject the AppService. Then there is a function named getHello() which is decorated with the @Get() decorator. The Get() decorator marks it as a get request, and without any paths in the parameter, it is just listening to the root /. In the function, it just uses the AppService injected from the constructor, and returns the getHello().
To truely see the efficiency of nestjs, let’s create a REST API. Run the following command in the root folder of the application
nest generate resource products
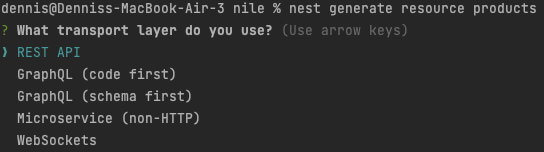
NestJS can create not just REST API, but also for graphQL, websockets, and microservices. But here, we will just select REST API.
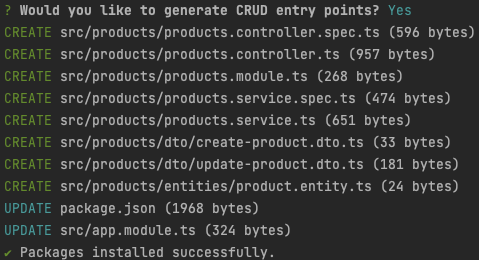
And let it generate the CRUD entry points for us.

We can see here it creates a new products module under the src folder, and creates all the module, service, controller, entity and dtos for us. And it also updates the AppModule to import the new ProductsModule.
@Module({
  imports: [ProductsModule],
  controllers: [AppController],
  providers: [AppService],
})
export class AppModule {}
The product.entity.ts contains the main Product entity for our module, with just an empty Product which we can customize.
export class Product {}
The create-product.dto.ts and update-product.dto.ts are data-transfer-objects, which are usually a subset of the original entity, just for the create and update apis, so that we don’t have to expose the unnecessary fields of the entity in the api. For example, the ID is going to be auto-generated, and not needed in the create api.
export class CreateProductDto {}
export class UpdateProductDto extends PartialType(CreateProductDto) {}
I like that the controller is created for us with all the necessary CRUD functions, and the service already injected in for us. You can see that there is a products in the @Controller() decorator, meaning this api will be exposed in localhost:3000/products.
@Controller('products')
export class ProductsController {
  constructor(private readonly productsService: ProductsService) {}

  @Post()
  create(@Body() createProductDto: CreateProductDto) {
    return this.productsService.create(createProductDto);
  }

  @Get()
  findAll() {
    return this.productsService.findAll();
  }

  @Get(':id')
  findOne(@Param('id') id: string) {
    return this.productsService.findOne(+id);
  }

  @Patch(':id')
  update(@Param('id') id: string, @Body() updateProductDto: UpdateProductDto) {
    return this.productsService.update(+id, updateProductDto);
  }

  @Delete(':id')
  remove(@Param('id') id: string) {
    return this.productsService.remove(+id);
  }
}
We just need to fill in the functions in our service.
@Injectable()
export class ProductsService {
  create(createProductDto: CreateProductDto) {
    return 'This action adds a new product';
  }

  findAll() {
    return `This action returns all products`;
  }

  findOne(id: number) {
    return `This action returns a #${id} product`;
  }

  update(id: number, updateProductDto: UpdateProductDto) {
    return `This action updates a #${id} product`;
  }

  remove(id: number) {
    return `This action removes a #${id} product`;
  }
}
To make this product useful, we shall add database access for the products, so that we can persist the data. NestJS integrates with TypeORM to make database access a breeze. So first, we have to install the necessary components. In this tutorial, we are just going to save our data in MariaDB.
npm install --save @nestjs/typeorm typeorm mysql2
We also need to install @nestjs/config, so that we can use the .env file, which we don’t commit, for our secrets.
npm install --save @nestjs/config
Then we need to add the config module and connection information to our AppModule.
import * as process from 'process';

@Module({
  imports: [
    ConfigModule.forRoot({ isGlobal: true }),
    ProductsModule,
    TypeOrmModule.forRoot({
      type: 'mysql',
      host: process.env.MARIADB_HOST,
      port: parseInt(process.env.MARIADB_PORT, 10),
      username: process.env.MARIADB_USER,
      password: process.env.MARIADB_PASSWORD,
      database: process.env.MARIADB_DATABASE,
      entities: [Product],
      synchronize: true, // to be removed for production
    }),
  ],
  controllers: [AppController],
  providers: [AppService],
})
Notice that there is an entities variable, which we populate it with an array containing just the Product. This sets up Product to be an entity to be managed by TypeORM.
The connection details are saved in a .env file in the root folder of the project as such.
MARIADB_HOST=localhost
MARIADB_PORT=3306
MARIADB_USER=root
MARIADB_PASSWORD=password
MARIADB_DATABASE=nile
We shouldn’t commit this .env file to the repository to protect our secrets
Setting the
synchonizevariable to true helps during development to create the tables automatically when we run the application, and this variable should be removed during production, so that our tables and data will not be reset everytime we deploy it.
Now we can populate our Product entity with the fields we need. First we annotate the Product class with the @Entity() decorator, and set up the columns with the @Column(). The id field is meant to be an autogenerated number, so it is annotated with the @PrimaryGeneratedColumn().
@Entity()
export class Product {
  @PrimaryGeneratedColumn()
  id: number;

  @Column()
  name: string;

  @Column()
  description: string;

  @Column()
  pictureUrl: string;

  @Column()
  category: string;

  @Column('decimal', { scale: 2 })
  price: number;
}
Then we update our ProductsModule to import TypeOrmModule.forFeature([Product]), so that we can inject the repository for Product in the classes in our module.
@Module({
  imports: [TypeOrmModule.forFeature([Product])],
  controllers: [ProductsController],
  providers: [ProductsService],
})
export class ProductsModule {}
So we add a constructor in our ProductsService to inject the product repository.
constructor(
    @InjectRepository(Product) private productsRepository: Repository<Product>,
) {}
Then we can update the other functions in the ProductsService to make use of the products repository.
async create(createProductDto: CreateProductDto) {
  const product = this.productsRepository.create(createProductDto);
  return await this.productsRepository.save(product);
}

async findAll() {
  return await this.productsRepository.find();
}

async findOne(id: number) {
  return await this.productsRepository.findOneBy({ id });
}

async update(id: number, updateProductDto: UpdateProductDto) {
  await this.productsRepository.update({ id }, updateProductDto);
  return this.productsRepository.findOneBy({ id });
}

async remove(id: number) {
  return await this.productsRepository.delete({ id });
}
Notice that in the create function, we are using the CreateProductDto, which should be a subset of the product entity. So, we should also update the class.
export class CreateProductDto {
  name: string;

  description: string;

  pictureUrl: string;

  category: string;

  price: number;
}
And thats it, we are done. Do remember to create the mariadb database in your local, and try out the apis. A full working copy of the above application is available on https://github.com/thecodinganalyst/nile.