
OpenID Connect login with Spring Boot
OpenID Connect (OIDC) is an identity authentication protocol, using the mechanism of OAuth2, to allow applications to delegate their login function to identity providers like Google and Facebook. By using OIDC, users can use their existing credentials (like their gmail or facebook account) to login to applications, without the need to create and remember a new password for the application.
With spring boot, we can easily incorporate OIDC login to our applications without much hassle, even the login page is created for us automatically. We can use it on top of the normal form login too. This article will demonstrate how to allow users to login with google and facebook, and the next article will discuss on how to add the user to the applications user repository if it is the first time login, so that whatever settings for the user can be saved and retrieved for future logins.
To start, make sure the required dependencies are added to the build.gradle.
dependencies {
    implementation 'org.springframework.boot:spring-boot-starter-oauth2-client'
    implementation 'org.springframework.boot:spring-boot-starter-web'
    testImplementation 'org.springframework.boot:spring-boot-starter-test'
}
The main dependency required for the OIDC login is the spring-boot-starter-oauth2-client, and I have the spring-boot-starter-web for the REST controller.
I have a very basic REST controller to display a “Hello World” message in the root site.
@RestController()
public class PageController {
    @GetMapping("/")
    public String home(){
        return "Hello World";
    }
}
And I will set up the spring security configurations as below.
@Configuration
public class SecurityConfig {

    @Bean
    public SecurityFilterChain filterChain(HttpSecurity http) throws Exception{
        http.authorizeHttpRequests()
                .anyRequest()
                .authenticated()
                .and()
                .oauth2Login()
                .and()
                .formLogin()
                .and()
                .logout();
        return http.build();
    }

    @Bean
    public PasswordEncoder passwordEncoder(){
        return new BCryptPasswordEncoder();
    }

}
The anyRequest().authenticated() ensures that any requests to any of the pages in our application will require the user to be logged in. So when a user tries to access any pages in the application (which in this case is http://localhost:8080/), will be redirected to a login page. The oauth2Login() gets spring boot to supply the oauth2 login options in the login form. We’ve also added formLogin() to allow the typical username and password login, for more details on how to configure the formLogin(), do visit my previous article on username and password authentication.
Google Login Configuration
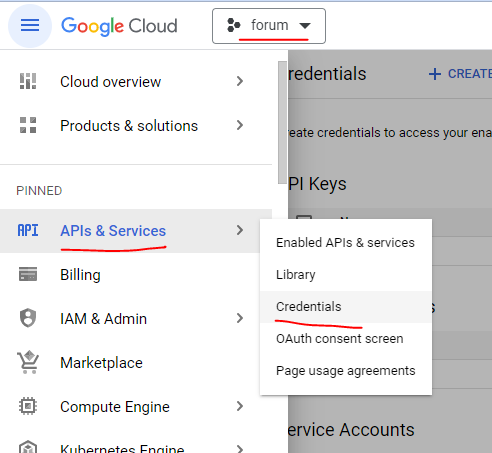
To allow login with gmail, we need a google cloud account. So if you do not already have a google cloud account, you need to create one at https://cloud.google.com/. After you created an account, you need to create a project for your application. Then make sure you have your project selected, navigate to API & Services > Credentials.
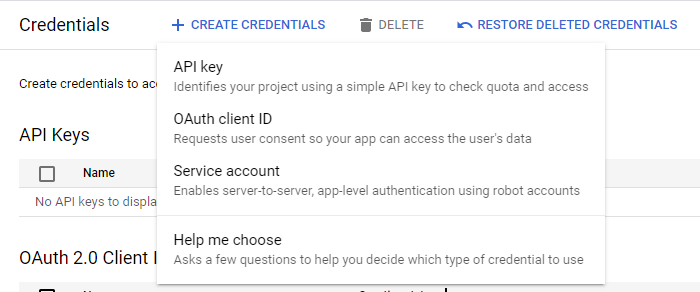
Then click on the + CREATE CREDENTIALS and select to create a OAUTH CLIENT ID.
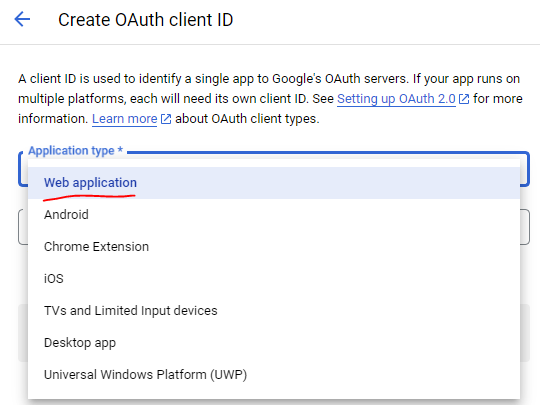
Choose Web Application for the application type.
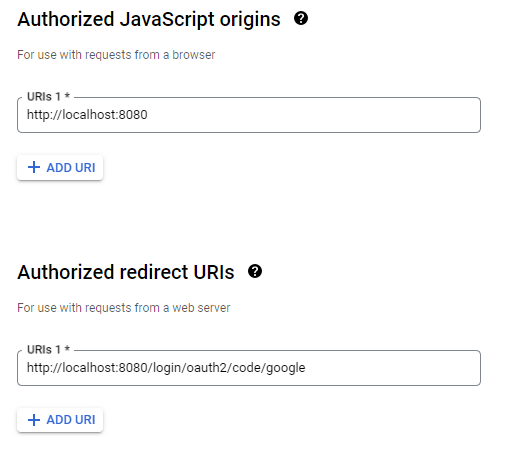
The Authorized Javascript origins specifies the url where your application should be called from, so that the calls from your application will not be blocked. As we are just running from our localhost, we just put http://localhost:8080. The Authorized redirect URIs is the URI which google should be redirecting your user to, after the user was successfully authenticated by google. The default redirect URI template in Spring is {baseURL}/login/oauth2/code/{registrationId}. So we shall enter http://localhost:8080/login/oauth2/code/google.
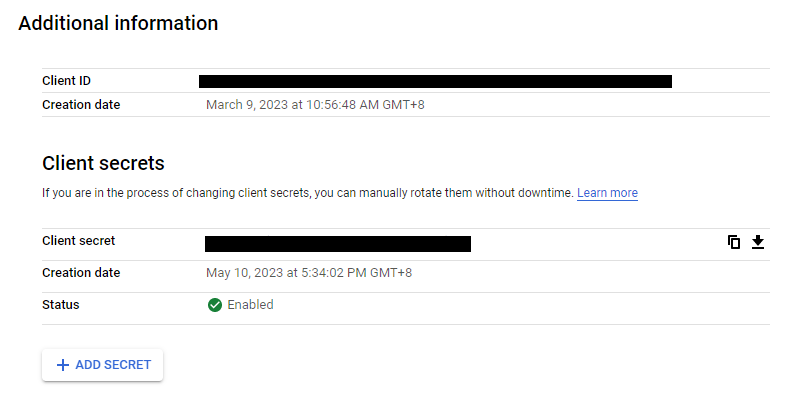
You should see the Client ID and Client Secrets at the right hand side of the same page. This is the credentials for your application to use the google login. Take note it and save it somewhere as we are going to need it in our application.properties later.
Facebook Login Configuration
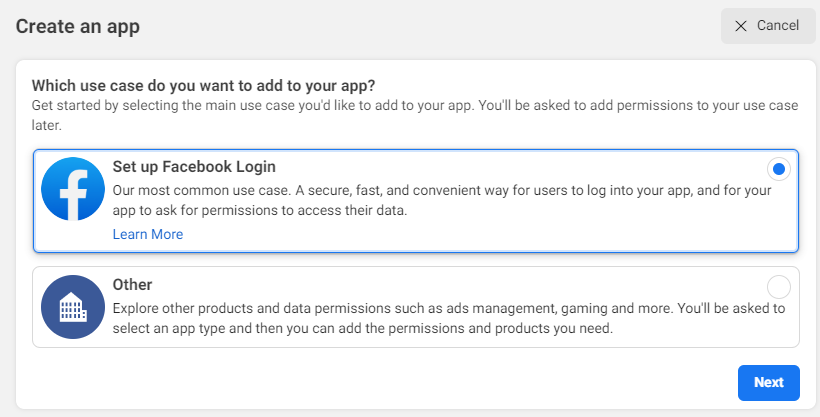
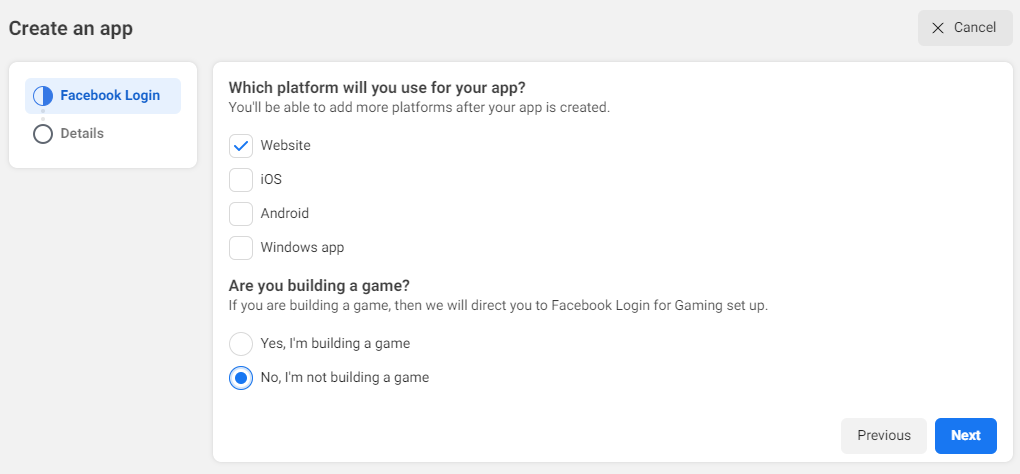
Likewise for facebook, we also need a facebook developer account. So head over to https://developers.facebook.com/ and create an account if you don’t have one. Then create an App in the developer portal, selecting Set up Facebook Login in the option.
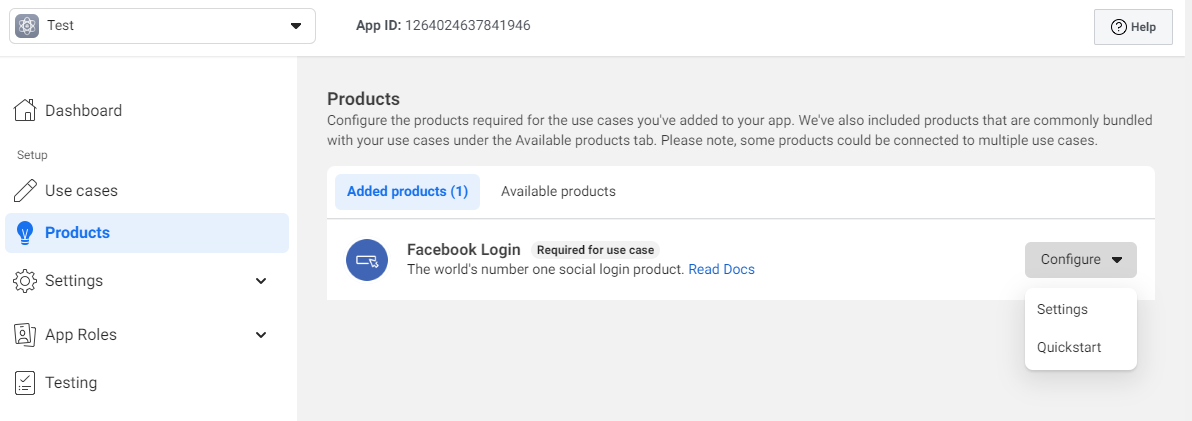
After the application is created, select Products from the menu, and click the Configure button for the Facebook Login, then select Settings.
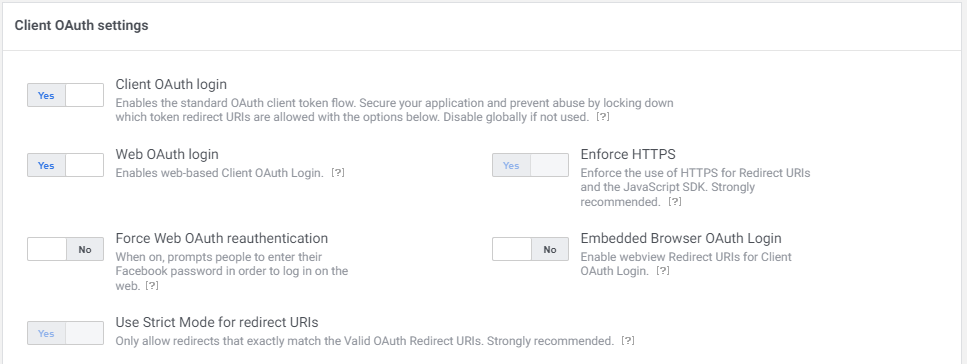
As the purpose of setting this up is to enable users to login via OIDC, which is based on OAuth2, we need to enable the Client OAuth login and Web OAuth login.
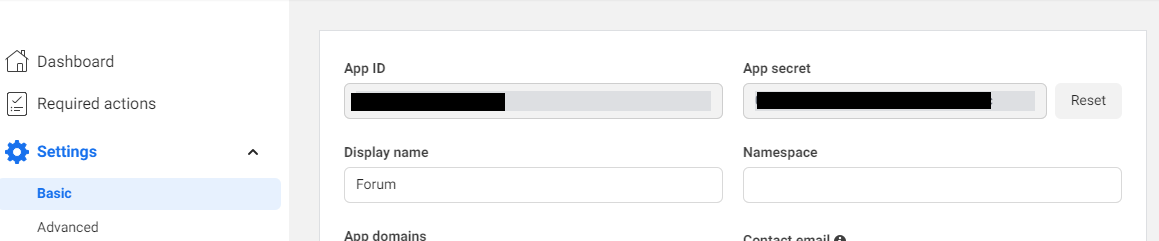
Lastly, select Settings from the menu, and choose Basic. Copy the App ID and App Secret.
Spring Application Configuration
By right, when we configure oAuth2, we need to configure many things like the authorizationUri, tokenUri, userInfoUri, etc. However, as these uris are unlikely to change often, spring boot actually provides configurations for Google, Github, Okta, and Facebook out of the box with CommonOAuth2Provider. So if you are using any of the above providers, you only need to specify the client-id and client-secret, as it is unique for every application.
So we need to add the following to our application.properties file, replacing the values with the respective client id and client secrets saved earlier.
spring.security.oauth2.client.registration.google.client-id=ENTER_YOUR_GOOGLE_CLIENT_ID
spring.security.oauth2.client.registration.google.client-secret=ENTER_YOUR_GOOGLE_CLIENT_SECRET
spring.security.oauth2.client.registration.facebook.client-id=ENTER_YOUR_FACEBOOK_CLIENT_ID
spring.security.oauth2.client.registration.facebook.client-secret=ENTER_YOUR_FACEBOOK_CLIENT_SECRET
That was almost correct, except no, we can’t commit our secrets to a repository. So instead, we should do this.
spring.security.oauth2.client.registration.google.client-id=${GOOGLE_OAUTH2_CLIENT_ID}
spring.security.oauth2.client.registration.google.client-secret=${GOOGLE_OAUTH2_CLIENT_SECRET}
spring.security.oauth2.client.registration.facebook.client-id=${FACEBOOK_OAUTH2_CLIENT_ID}
spring.security.oauth2.client.registration.facebook.client-secret=${FACEBOOK_OAUTH2_CLIENT_SECRET}
So, instead of saving our secrets publicly, we use environment variables. But to run it locally, we should save the environment variables in our configuration. If you are using IntelliJ, right click the bootRun in our gradle window on our IDE (IntelliJ), and select Modify Run Configuration.... Then add the above variables as environment variables. Afterwards, when you run bootRun again to start the application, the environment variables will be automatically added to the command which our IDE use to start our application.
To run it on our CI/CD environment on Github, go to your project, click Settings from the menu, then in the Secrets and variables section, under Action, create either the Environment Serects or Repository secrets.
Login Page
Now, when we bootRun the application, and go to our browser, navigating to http://localhost:8080, we will be automatically redirected to a login page provided by Spring Boot, with the options to login with OAuth2 by either Google or Facebook.

A full working copy of the code above is available at https://github.com/thecodinganalyst/oauth2.