
Getting started Spring Boot Application
Frameworks have made developing backend applications much easier compared to doing everything manually. For example, we no longer need to deal with the http requests and responses manually compared to when web applications first started. We don’t even have to write the sql scripts to get the data from the database! All we have to do is to focus on the business logic, and familiarize ourselves with the framework. Actually, familiarizing ourselves with the framework is becoming the more difficult part of the software developer’s job, as there are a ton of settings to remember and the settings aren’t really displayed in a catalog to choose from. One has to code them in manually, so either you know the setting or you don’t. In this article, I shall do a quick introduction to the most common Spring framework, and use it to create a backend application for a forum application.
In our forum application, users can create topics to discuss, and within each topic, users can write posts to discuss within the users. A very simplified class diagram to demonstrate the relationships is as below.
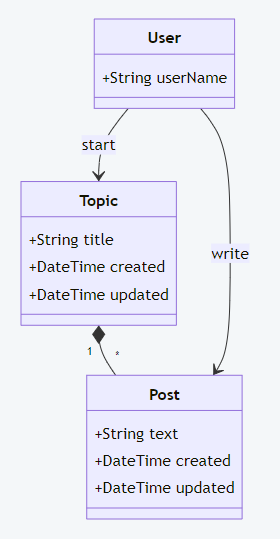
However, in the scope of showing how to use Spring, we shall just focus only on the Topic and Post for now.
As a backend application, this application we are working on will just be providing the API endpoints to manipulate the Topics and Posts (described in the table below) with JSON as the output, and the data will be persisted in a MariaDB database locally.
| Endpoint | Method | Description |
|---|---|---|
| /topics | POST | Create a new topic |
| /topics | GET | List all topics |
| /topics/{topicId} | GET | Get a particular topic |
| /topics | PUT | Updates a topic |
| /topics/{topicId} | DELETE | Deletes a topic |
| /topics/{topicId}/posts | GET | Lists all posts in a topic |
| /posts | POST | Create a new post |
| /posts/{postId} | GET | Get a particular post |
| /posts | PUT | Updates a post |
| /posts | DELETE | Deletes a post |
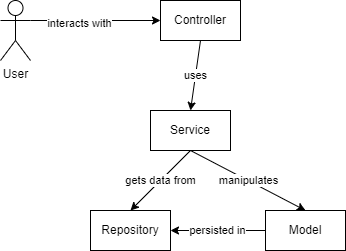
Spring follows the model-view-controller framework, where the model is the core data of the application, and the controller is where the model is requested and manipulated. In our case, the models will be the Post and Topic.
We start by creating a new project with the IntelliJ IDE, it makes our life much easier, as we can easily browse the source code of the libraries we are using with CTRL + Click, and it helps to import the libraries we use in our code automatically when you use it, so that you don’t have to worry about which is the source library.
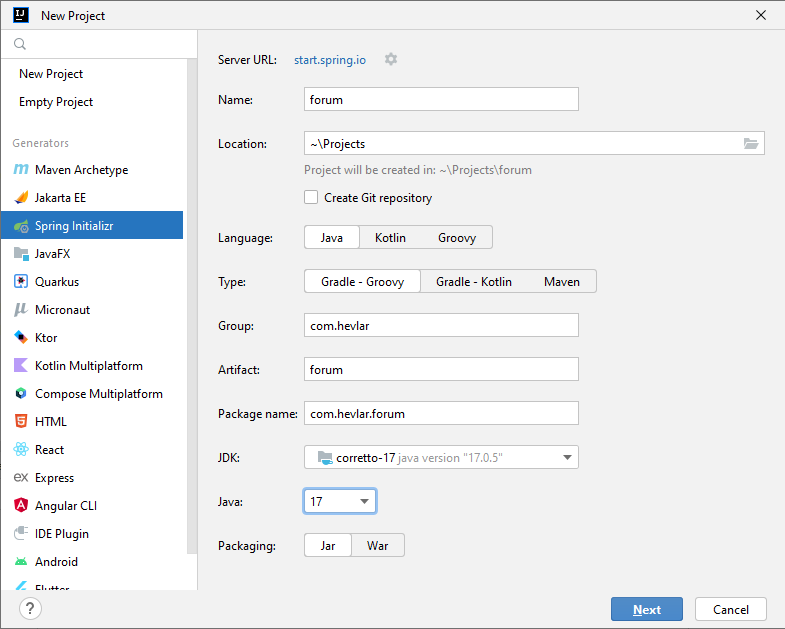
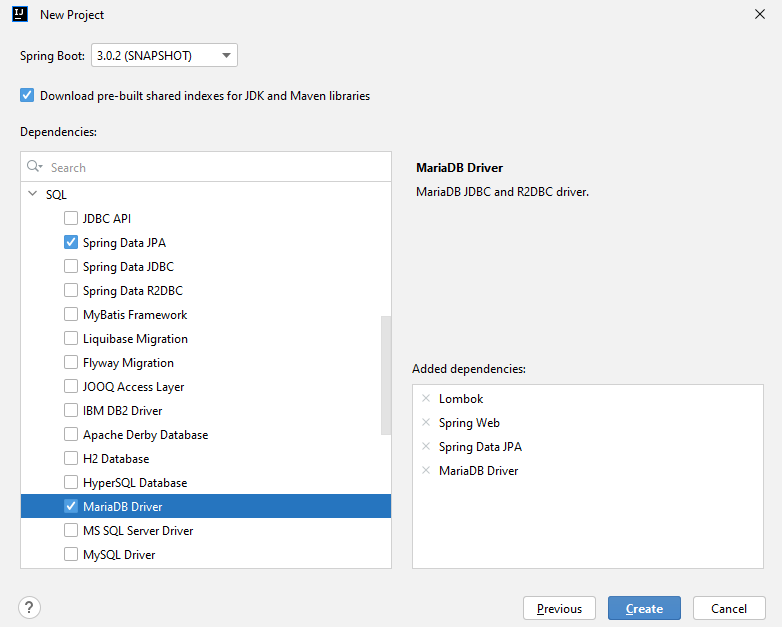
Choose the Spring Initializr from the left hand side of the New Project popup, and enter your project name and etc. I’m using Gradle as my build tool of choice because the Groovy syntax used is very much alike json, so it’s much cleaner to read than the XML used by Maven. Next, we’ll be presented with a list of dependencies to be choosen for use in our project. Since, we are creating an API web application, we should add Spring Web into our project. Lombok is also added because it can save us a lot of code needed for the constructors, getters and setters, etc, making our code very clean.
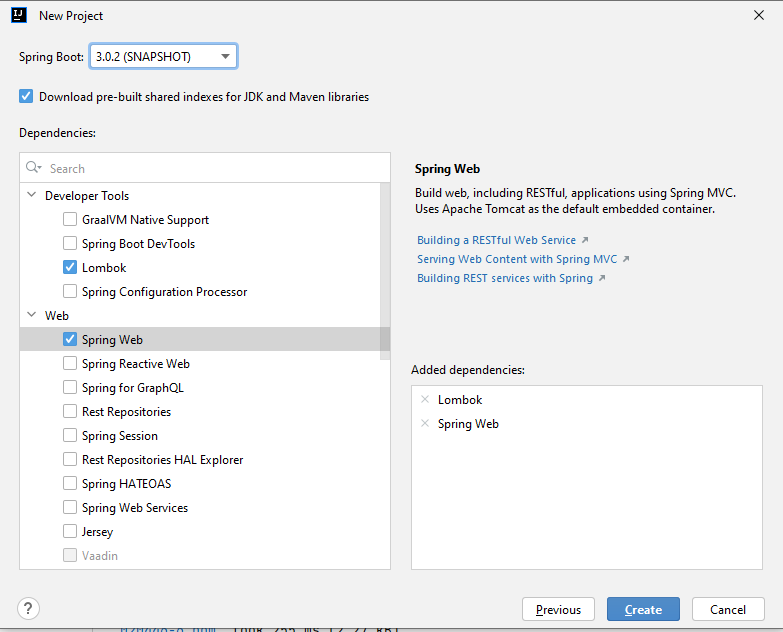
Then we scroll down to the SQL category and select Spring Data JPA and MariaDB Driver, which is the database we will be using. Click the Create button and IntelliJ will download all the necessary libraries for our project.
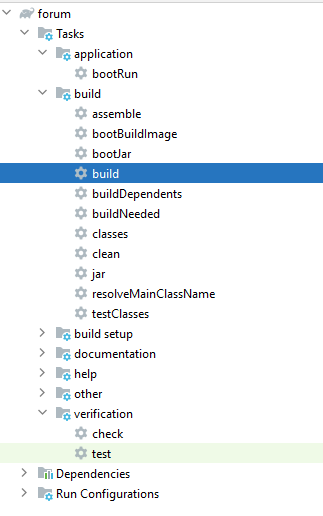
After everything is downloaded, we are ready to test run our empty application. In the gradle plugin at the right side of the IDE, we can see the list of tasks available. We just need to know the 3 basic ones - build, test and bootRun. Simply double click on any of the task to run them. We won’t have any output to show except for the terminal output in the Run panel at the bottom of the IDE.
To start coding, we create a new folder named model in our main package, and create the Topic class.
@Builder
@NoArgsConstructor
@RequiredArgsConstructor
@AllArgsConstructor
@Entity
@Data
@Table(name = "TOPIC")
public class Topic {
    @Id
    @GeneratedValue
    @Column(name = "TOPIC_ID")
    Long topicId;

    @NonNull
    @Column(name = "TITLE", unique = true, nullable = false)
    String title;

    @CreationTimestamp
    @Column(name = "CREATED", nullable = false)
    LocalDateTime created;

    @UpdateTimestamp
    @Column(name = "UPDATED", nullable = false)
    LocalDateTime updated;

    @OneToMany(mappedBy = "topic", cascade = CascadeType.ALL)
    private List<Post> posts;
}
The @Entity annotation indicates the class as something like a data object, which in the case of a relational database, is a table. The @Table annotation with the name parameter allows us to specify the name of the table. This @Table is optional, and if absent, the table will just be named by the same name as the class. The @Data is a lombok annotation, which will help us to create the constructors, getters, setters, equals function, hashcode function during runtime, so we can save on writing these codes. The @Id annotation indicates that the topicId field is the primary key of the @Entity, and the @GeneratedValue indicates that the value will be auto generated by the database. The @Column with the name attribute specifies the desired column name of the field, which again is optional. The unique parameter in the @Column annotation will set the annotated column to have unique values and nullable specifies if null is allowed in the column’s values. The @CreationTimestamp will get the database to provide the timestamp value for the column automatically when the data is created, and the @UpdateTimestamp will likewise get the database to provide the timestamp value when it is updated.
We’ll create the Post class first before we discuss on the @OneToMany annotation.
@Builder
@NoArgsConstructor
@RequiredArgsConstructor
@AllArgsConstructor
@Entity
@Data
@Table(name = "POST")
public class Post {
    @Id
    @GeneratedValue
    @Column(name = "POST_ID")
    Long postId;

    @NonNull
    @Column(name = "TEXT", nullable = false)
    String text;

    @CreationTimestamp
    @Column(name = "CREATED", nullable = false)
    LocalDateTime created;

    @UpdateTimestamp
    @Column(name = "UPDATED", nullable = false)
    LocalDateTime updated;

    @NonNull
    @JsonIdentityInfo(generator = ObjectIdGenerators.PropertyGenerator.class, property = "topicId", scope = Topic.class)
    @ManyToOne
    @JoinColumn(name = "TOPIC_ID")
    private Topic topic;
}
In our design, each Topic can have multiple Posts, so it is a one-to-many relationship. We should have a topicId in the Post table as the foreign key, but we do not need any additional fields in the Topic table. But we would still like to be able to access the list of Posts from the Topic. To do that, we can create the List<Post> posts field in Topic, and annotate it with the @OneToMany annotation, specifying the mappedBy to be topic from the Post class. Spring can automatically relate it to the Post class because it is the type of the field. Then in the Post class, we should add the Topic topic field, and annotate it with the @ManyToOne annotation. We also add the @JoinColumn to indicate it to be a foreign key field, something like the @Column for normal fields.
Because each topic have multiple posts, and each post have a topic, when we fetch a Topic, it will fetch the list of Posts for the topic, and for each of the Post, it will fetch the Topic again, in a neverending recursion. So we add the @JsonIdentityInfo annotation to the topic attribute of our Post class, so that it will just contain the topicId, e.g. [1] instead of the whole Topic object (e.g. [{topicId: 1, title: 'topic', ...}]) when we fetch the Post.
I initially use the
@JsonManagedReferenceand@JsonBackReferenceon the Topic’s posts field and Post’s topic field. With these annotations, the parentTopicwill fetch the childPosts, but the childPostwill not fetch the parentTopic. However, this will apply to all serialization, such that when we want to create a newPost, the topic field is also left out when we use the objectmapper to serialize it in our test functions, and this is not desirable.
Next, we generate the repository classes for the Topic and Post.
@Repository
public interface TopicRepository extends JpaRepository<Topic, Long> {
}
@Repository
public interface PostRepository extends JpaRepository<Post, Long> {
    List<Post> findAllByTopic_TopicId(Long topicId);
}
The @Repository annotation indicates the class as a repository in Spring. Notice that the repository is an Interface, not a Class. Spring will automatically create the class during runtime, with all the necessary functions to query the repository. All basic functions like listing all the data, getting a particular data by id, saving the data, etc are all generated during build. The functions can even be called during coding provided it follows the standard query keywords. The interface should extend JpaRepository, which is generic class. The first generic parameter is the type of the entity and the second generic parameter is the type of the entity’s id field. We can also add non standard function like the findAllByTopic_TopicId function in the PostRepository. The findAllBy is a keyword to find all data. It is followed by Topic which is the name topic field in Post entity, and we need to add the _TopicId as it is a foreign key, and we want it to search by the topicId field.
After we got the repository, let’s create the services.
@Service
public class TopicService {
    private final TopicRepository topicRepository;

    public TopicService(TopicRepository topicRepository){
        this.topicRepository = topicRepository;
    }

    public Topic create(Topic topic){
        return topicRepository.save(topic);
    }

    public List<Topic> list(){
        return topicRepository.findAll();
    }

    public Topic get(Long topicId){
        return topicRepository.findById(topicId).orElseThrow();
    }

    public Topic update(Topic topic){
        LocalDateTime created = topicRepository.findById(topic.getTopicId())
                .orElseThrow()
                .getCreated();
        topic.setCreated(created);
        return topicRepository.save(topic);
    }

    public void delete(Long topicId){
        if(!topicRepository.existsById(topicId)) throw new NoSuchElementException();
        topicRepository.deleteById(topicId);
    }
}
@Service
public class PostService {

    private final PostRepository postRepository;

    public PostService(PostRepository postRepository){
        this.postRepository = postRepository;
    }

    public Post create(Post post){
        return postRepository.save(post);
    }

    public List<Post> list(Long topicId){
        return postRepository.findAllByTopic_TopicId(topicId);
    }

    public Post get(Long postId){
        return postRepository.findById(postId).orElseThrow();
    }

    public Post update(Post post){
        LocalDateTime created = postRepository.findById(post.getPostId())
                .orElseThrow()
                .getCreated();
        post.setCreated(created);
        return postRepository.save(post);
    }

    public void delete(Long postId){
        if(!postRepository.existsById(postId)) throw new NoSuchElementException();
        postRepository.deleteById(postId);
    }
}
The services are where we add in our business logic, and we need to annotate the classes with the @Service annotation so that Spring will know the purpose of the class as the service. We use the standard dependency injection by constructor method to bring in the repository into the class.
Last but not least, we create our controllers, which is where the API is served.
@RestController
@RequestMapping("/api/v1/topics")
public class TopicController {

    private final TopicService topicService;

    public TopicController(TopicService topicService){
        this.topicService = topicService;
    }

    @GetMapping
    public List<Topic> listTopics(){
        return topicService.list();
    }

    @PostMapping
    @ResponseStatus(HttpStatus.CREATED)
    public Topic createTopic(@RequestBody Topic topic){
        return topicService.create(topic);
    }

    @GetMapping(value = "/{topicId}")
    public Topic getTopic(@PathVariable("topicId") Long topicId){
        try{
            return topicService.get(topicId);
        }catch (NoSuchElementException e){
            throw new ResponseStatusException(HttpStatus.NOT_FOUND);
        }
    }

    @PutMapping
    public Topic updateTopic(@RequestBody Topic topic){
        try{
            return topicService.update(topic);
        }catch (NoSuchElementException e){
            throw new ResponseStatusException(HttpStatus.NOT_FOUND);
        }

    }

    @DeleteMapping(value = "/{topicId}")
    public void deleteTopic(@PathVariable("topicId") Long topicId){
        try{
            topicService.delete(topicId);
        }catch (NoSuchElementException e){
            throw new ResponseStatusException(HttpStatus.NOT_FOUND);
        }

    }
}
@RestController
@RequestMapping("/api/v1")
public class PostController {

    private final PostService postService;

    public PostController(PostService postService){
        this.postService = postService;
    }

    @GetMapping(value = "/topics/{topicId}/posts")
    public List<Post> list(@PathVariable("topicId") Long topicId){
        return postService.list(topicId);
    }

    @PostMapping("/posts")
    @ResponseStatus(HttpStatus.CREATED)
    public Post create(@RequestBody Post post){
        return postService.create(post);
    }

    @GetMapping(value = "/post/{postId}")
    public Post get(@PathVariable("postId") Long postId){
        try{
            return postService.get(postId);
        }catch (NoSuchElementException e){
            throw new ResponseStatusException(HttpStatus.NOT_FOUND);
        }
    }

    @PutMapping("/post")
    public Post update(@RequestBody Post post){
        try{
            return postService.update(post);
        }catch (NoSuchElementException e){
            throw new ResponseStatusException(HttpStatus.NOT_FOUND);
        }

    }

    @DeleteMapping(value = "/post/{postId}")
    public void delete(@PathVariable("postId") Long postId){
        try{
            postService.delete(postId);
        }catch (NoSuchElementException e){
            throw new ResponseStatusException(HttpStatus.NOT_FOUND);
        }
    }
}
The @RestController annotation will indicate to Spring that we are serving REST api from this class, so that it can generate all the necessary code for the http requests and responses for us, we just need to indicate the http method and endpoint in our functions, and just focus on our busines logic. The @RequestMapping annotation allow us to specify the endpoint for all the functions in the class. Each function is annotated with either of the @GetMapping, @PostMapping, @PutMapping, @DeleteMapping to specify the http method to use. The parameter specifies the additional endpoint path for the function, with the path variable in curly brackets. For example, to add the topic id in the path, which is a variable, we specify the /{topicId} in the GetMapping and add the @PathVariable annotation with the topicId parameter, matching the topicId in the GetMapping. So that /api/v1/topics/1 will specify to get the Topic with topicId = 1.
@GetMapping(value = "/{topicId}")
public Topic getTopic(@PathVariable("topicId") Long topicId){
    try{
        return topicService.get(topicId);
    }catch (NoSuchElementException e){
        throw new ResponseStatusException(HttpStatus.NOT_FOUND);
    }
}
We can catch the exceptions and throw a new ResponseStatusException with the appropriate http status code too, as in the example above throwing 404 Not Found if there is a NoSuchElementException thrown by the TopicService.
We can also specify alternative return code with the @ResponseStatus annotation like the create function below to return 201 Created instead of the standard 200 OK.
@PostMapping("/posts")
@ResponseStatus(HttpStatus.CREATED)
public Post create(@RequestBody Post post){
    return postService.create(post);
}
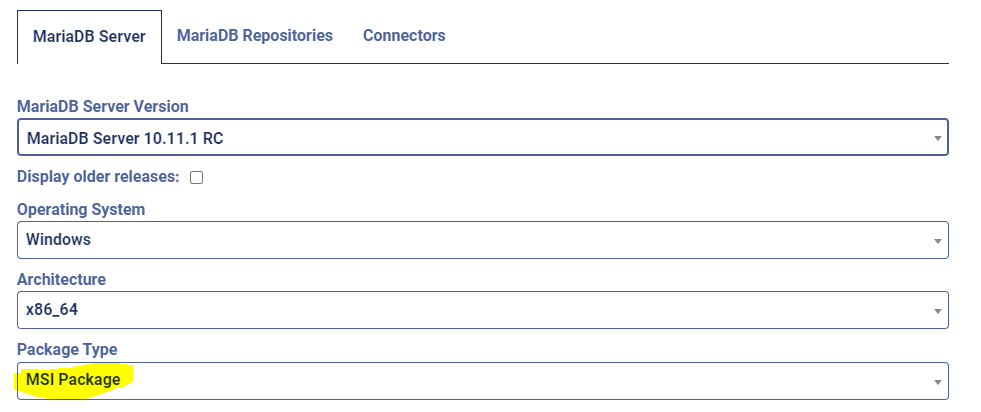
We are not done yet. Since we specify MariaDb as the database, we should have MariaDb running as a service on our computer. If you don’t already have it, download the MSI Package from the official MariaDb website. The first option could be an alpha pre-release, which doesn’t have the msi package. To make live easier, choose the next available release candidate (RC) version, so that you don’t have to create the service yourself.
The MariaDB downloaded is just the server version, without any user interface. You can only run it from the terminal. To make things easier, download a GUI client, I’m using HeidiSQL. We will create a new user and give it access to only the database used by this application. Then we provide the database settings in our application.properties file.
spring.jpa.hibernate.ddl-auto=create
spring.datasource.url=jdbc:mariadb://localhost:3306/forum
spring.datasource.username=forumApp
spring.datasource.password=forumPassword
spring.datasource.driver-class-name=org.mariadb.jdbc.Driver
With the spring.jpa.hibernate.ddl-auto set to create, the application will create the tables automatically when the application runs. But this shouldn’t be used for production, else your data will be gone and the tables re-created everytime you stop and start the application. Change it to update if you are running it in production so that your data can persist. For more information on this attribute, refer to https://docs.spring.io/spring-boot/docs/current/reference/html/howto.html#howto.data-initialization.
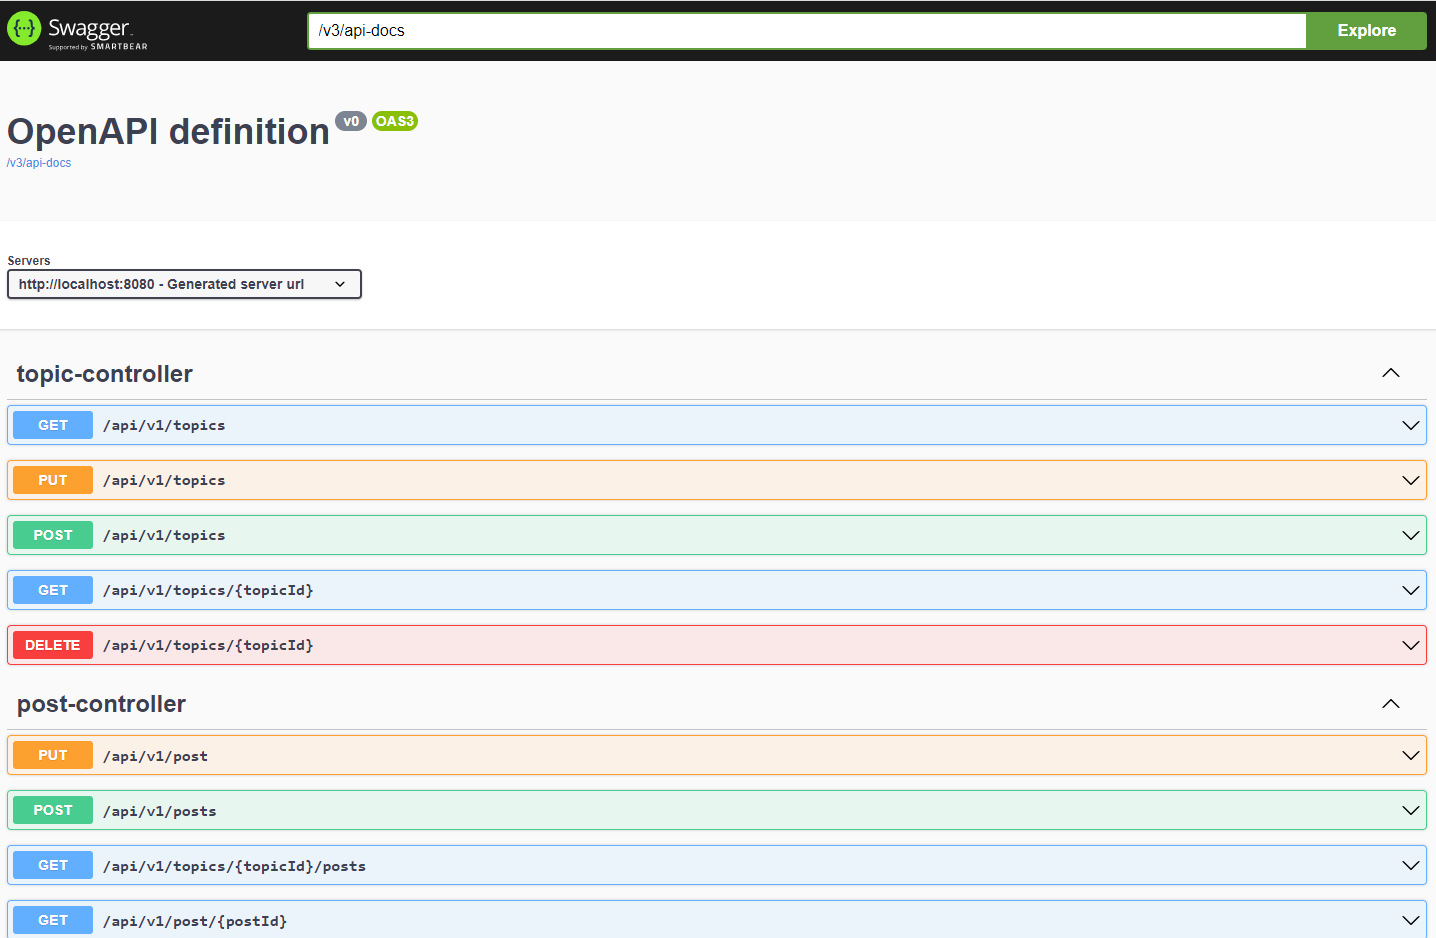
Lastly, in order to view and try the api easily, we should enable swagger. Simply add the spring-doc dependencies in the build.gradle file.
implementation('org.springdoc:springdoc-openapi-starter-webmvc-ui:2.0.2')
implementation('org.springdoc:springdoc-openapi-starter-common:2.0.2')
With that, we are done! Double-click on the bootRun task in the gradle plugin, and navigate to http://localhost:8080/swagger-ui/index.html in your browser.
You might see the following non blocking issue when you
bootRunjakarta.validation.NoProviderFoundException: Unable to create a Configuration, because no Jakarta Bean Validation provider could be found. Add a provider like Hibernate Validator (RI) to your classpath.To resolve it, add
implementation 'org.springframework.boot:spring-boot-starter-validation:3.0.1'to your gradle dependency. Source.
The source code for the above application is available on my github tagged as the initial-sample release, as the code will be updated subsequently as I introduced new articles on how to improve the solution.
This is part of a series illustrating how to build a backend Spring boot application.
- Getting Started Spring Boot Application
- Deploying to Docker
- Spring Data Testing
- Testing Services
- Unit Testing of Controller
- Integration Testing
- Code quality review with Sonarqube
- Configure Spring Security CSRF for testing on Swagger
- Configure Access Management in Spring Security
- Validate inputs in Spring Boot RestController